VMWare ESXi & VCSA Lab Setup
Time To Set Up A Lab
Here we go. Setting up a home lab for vCSA, ESXi and Windows Server for DNS. This is the guide I created, and steps I followed to get the very beginnings of my home lab set up. This won’t work for everyone as I understand most of us don’t run around with overblown home systems, but if you have the spare hardware it’s very possible to get some exposure to the UC Servers in lab.
This lab setup makes use of VMWare Workstation 14/15, and utilizes the hardware I have in my home PC in order to split up resources and get the most bang for my buck.
In this post we’ll go over some preliminary information, install and look at the Network Editor within VMWare Workstation, and also install the Windows server and set up DNS services, Host and PTR records. We’ll follow this up with the ESXi and vCSA installs.
Requirements
Now these aren’t hard requirements, but the more resources you have available the more you have to play with. Here’s what I’ve got that’s relevant to the build – storage, CPU and memory capacity:
Ryzen 1700x (8c/16t)
32GB 2666mhz RAM (DDR4)
2x 1TB Storage Drives
VMWare Workstation lets me split up one, or both of the TB drives if I want to for VM space, I have 16 threads to allocate out to VMs. If I modify the ISO to install on anything I can even trim down the cpu/mem/storage allocated to a CallManager or Unity node without it complaining on install (it’s lab anyway, so I don’t care THAT much about performance).
Quick Notes
Working Directory
Working directory for me while setting up this lab is “E:\VirtualMachines" as this is where my VMs are stored. Each VM should be in its own folder.
Example:
ESXi 6.5 VM – E:\VirtualMachines\ESXi\
vCSA 6.5 VM – E:\VirtualMachines\vCSA\
Win2012R2 VM – E:\VirtualMachines\Win2012R2\
This keeps .vmdk, .vmx, etc. files separate and prevents any issues between the VMs, and is easier for disk management purposes.
IP Addressing
Working IP Address space for me is 10.255.255.X 255.255.255.0. I will be using .162, .163, and .164 for the VMs.
Example
ESXi – 10.255.255.162
vCSA – 10.255.255.163
Win2012R2 (DNS) – 10.255.255.164
Setting up VMware Workstation 14
Download and Install
The download and install process for VMWare Workstation 14 is extremely straight forward and does not warrant a separate doc. You can download a trial of the software from VMWare.
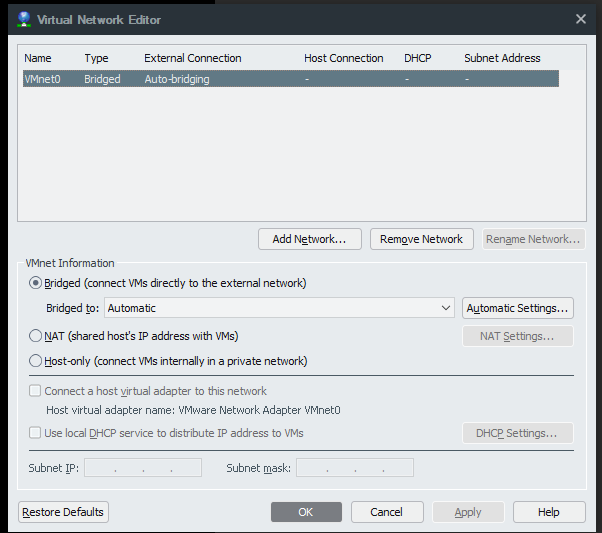
Setting up the Virtual Network
The exception to being easy and straight forward is the Virtual Network Editor.
- Once VMWare Workstation is installed, Navigate to the below menu Edit > Virtual Network Editor
- Confirm only vmnet0 exists, and is bridged. This is default. This can be used to create new “networks”, which will create VMnetX. It is useful to create a new network, such as 10.1.1.0/24 and inject a Virtual Adapter into your Host OS for access in to that subnetwork. It’s not required for this setup, but can be used to add separate networks for: Storage, VMs, or even vMotion.
- Click OK and close it out.
Setting up DNS on Win 2012 R2
Create the Virtual Machine
- File > New Virtual Machine
- Typical
- Installer disc image file (iso): %USERPROFILE%\Downloads\?WinServ2012_r2.iso (or relevant iso location)File > New Virtual Machine
- Version of Windows to Install Windows Server 2012 R2 Standard
- Full Name - User defined
- Password/Confirm - User defined
- Hit Next w/o a CD-Key Click Yes
- VM Name - User defined
- Location - User defined
- Size - 60GB - Store as a Single Disk
- Customize Hardware - Change Network Adapter 0 - NAT –> Bridged
- Save
- Power On
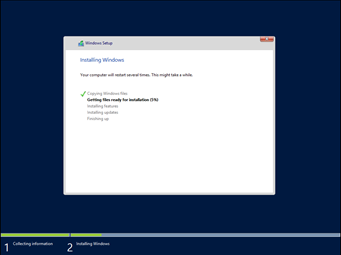
Windows Server 2012 R2 Install
A window will pop up saying “Installing Windows”, the below is done automagically as with any Windows install.
VMWare tools should install by default when done. If they don’t, follow normal process to mount the VMWare tools iso and install the driver package.
Configure Windows 2012 R2 Network Connectivity
An initial reboot should be performed to finish installing VMware Tools.
- Network Adapter > Open Network and Sharing Center > Change Adapter Settings > Ethernet 0 > Properties
-
Internet Protocol Version 4 (TCP/IPv4) > Properties
Use the following IP address: (Change to match your internal network address space, and default gateway -- these are sample settings) 10.255.255.164 <-- IP within /24 network of 10.255.255.X 255.255.255.0 <-- /24 Subnet Mask 10.255.255.1 <-- Default GW/Router to ISP Use the following DNS server addresses (Change the 2nd to match your internal network DNS ip -- these are sample settings) 127.0.0.1 <-- Localhost (DNS server) 10.255.255.1 <-- Default GW/Router to ISP - Click OK
- Close

Run ping tests to google.com, other devices on the network - whatever - to confirm that you have network access. If you do not, perform basic troubleshooting, check the VM Settings to ensure Ethernet 0 (Network Adapter) is bridged.
Install DNS Feature
- Server Manager.
- Manage > Add Roles and Features > Next.
- Role-based or feature-based installation > Next.
- Select a server from the server pool > Next.
- DNS Server > Click checkbox > Yes on the box that pops up > Next.
- Next > Next > Next > Install.
- Monitor the feature installation, when it completes, feel free to restart for good measure.
Configure a Forward Lookup Zone
vCSA requires both forward and reverse lookup zones for install/functionality. Supporting esxi as a hostname, and esxi.voip.local, as well as vcsa.voip.local will require DNS to be configured.
- Server Manager.
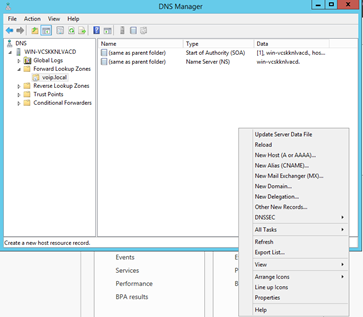
- Tools > DNS.
- Expand DNS > Win-VCSKKNLVACD (should change depending on your Win Server hostname is, that’s autogenerated during install).
-
Right click Forward Lookup Zones → New Zone.
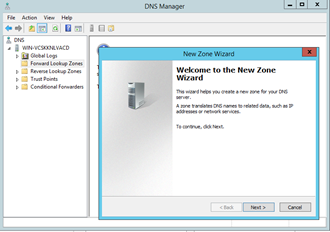
- Next > Primary Zone > Zone Name. Voip.local (if you have an alternate local domain name, use it).
- Create a new file with this file name: Voip.local (if you have an alternate local domain name, use it). Do not allow dynamic updates. We will not need to update these frequently, and with only a handful of DNS entries, it’s easy to do so manually.
- Next > Finish. You should now have a new Forward Lookup Zone : voip.local. Click it in the left hand panel to open it.
- Now right click on the right hand side → New Host (A or AAAA)….
Insert name “esxi”, this will autofill “esxi.voip.local”.
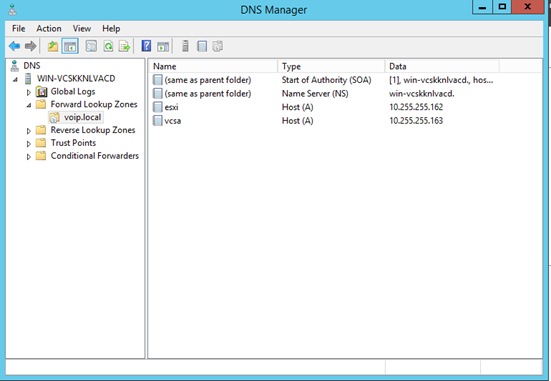
- Insert IP address of “esxi” node if/when installed.
- Add host.
- Repeat the above for “vcsa”.
Create a Reverse Lookup Zone
- Right click Reverse Lookup Zones > New Zone.
- Next.
- Primary Zone.
- IPv4 Reverse Lookup Zone. Network ID: 10.255.255 (Change this for the first 3 octets of your home network’s address space).
- Next.
- Create a new file with this file name: 255.255.10.in-addr.arpa.dns (again, the IP portion will change depending on your home network’s address space). Do not allow dynamic updates.
- Next.
- Finish.
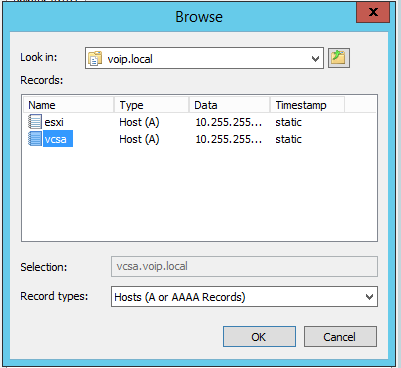
- Right click on the right hand panel > New PTR.
- Host IP address Should already be filled with 10.255.255 or equivalent as provided in step above. Add last portion of IP. For me this is ..*.163 for vCSA.
- At the bottom click Browse… > Double click the server under Records, then the Forward Lookup Zone, then voip.local, then the vCSA entry. Click OK then OK again. You should now see the reverse lookup PTR record for vCSA.
Verifying local DNS Resolves FQDN to IP
From Powershell (or cmd/Command Line) issue an “nslookup vcsa.voip.local” (replace domain if you’ve changed it)
PS C:\Users\kenop> nslookup vcsa.voip.local
Server:  localhost
Address:  127.0.0.1
Name:    vcsa.voip.local
Address:  10.255.255.163
PS C:\Users\kenop> nslookup esxi.voip.local
Server:  localhost
Address:  127.0.0.1
Name:    esxi.voip.local
Address:  10.255.255.162
PS C:\Users\kenop>
Verifying remote DNS Resolves FQDN to IP
- On your Host PC (Not the Windows Server), go to Network and Sharing Center.
- Click on “Change Adapter Settings”.
- Right click Ethernet > Properties. This should be your default NIC that connects out to your home router/modem.
- Internet Protocol Version 4 (TCP/IPv4) > Right click > Properties.
- Use the Following IP Address. Use the IP address already assigned to you, subnet mask 255.255.255.0, and default gateway should be the IP of your router. If you don’t know these details, check CMD/PS > ipconfig.
-
Use the following DNS Server addresses.
10.255.255.164 <IP of Windows 2012 R2> 8.8.8.8 -
Issue an nslookup from the host OS and confirm ESXi and vCSA resolve.
 kenop@KenWSLUbuntu:~$ nslookup vcsa.voip.local
 Server:         10.255.255.164
 Address:        10.255.255.164#53
 Name:   vcsa.voip.local
 Address: 10.255.255.163
kenop@KenWSLUbuntu:~$ nslookup esxi.voip.local Server: 10.255.255.164 Address: 10.255.255.164#53 Name: esxi.voip.local Address: 10.255.255.162 - Done!
Now that we’ve finished setting up DNS, vCSA and ESXi can be installed in separate VMs.
Setting up ESXi 6.5 in VMWare Workstation
Create ESXi VM
- File > New Virtual Machine > Custom.
- Hardware Compatability > ESXi 6.5 > Next.
- Installer Disc Image > “VMware-VMvisor-Installer-6.5.0.iso” > Next. Name it what you wish. Locate it where you wish. I use E:\VirtualMachines<vmname>. My E:\ drive is a 1tb storage drive.
-
Hardware Specs.
Number of processors: 2, number of cores, 2. (Modify based on your machine specs -- using Ryzen 7 1700x 8c 16t). Memory - 8GB (Modify based on your machine specs -- using 3200mhz 32gb RAM kit) Network - Use bridged networking (this attaches the vnic for ESXi vm directly to Ethernet interface within windows. I/O Controller Type - Paravirtualized SCSI. Also choose SCSI type for VDisk type. - Create a new disk. Allocate a sufficient amount of disk space. For this example I will allocate 200GB. Allocate all disk space now, store virtual disk as a single file.
- Disk file name should be fine, click next.
- Customize Hardware > Click Network Adapter > Bridged.
- Close and finish the VM creation.
It will now take a few moments to allocate the full disk space and zero it all out. The ESXi host should power up and be sitting at the ESXi 6.5 install screen once finished.
Install ESXi
- Power on the VM.
- Hit Enter to proceed with install of VMVisor.iso.
- Press F11 to agree.
- Select Local storage created in step 1. (Hit Enter). Example: VMware, VMWare Virtual S (mpx.vmhba0:C0:T0:L0) 200GB
- Select keyboard Layout.
- Choose password.
- Confirm Install (Select F11).
- Watch install progress bar 0 »»» 100. Fun, right?
- Hit “Enter” to reboot and boot into ESXi.
- When the VM Starts, hit F2, enter root pw and hit F2 again to enter System Customization.
- IPv4 Configuration. Set to static (using space-bar to select, and enter to confirm). This will keep the existing IP given by DHCP, but hard code it to prevent the IP from changing, which would be an issue with DNS.
- IPv6 Configuration. Turn off (using space-bar to select the option, and enter to confirm).
- Custom DNS Suffix. Set to whatever you’re using for your lab, mine is voip.local.
- Network Adapters. Set the bridged adapter (Ethernet0) to be the selected default management connection, if it is not already.
Test access to ESXi
-
Resolve hostname using nslookup and ping IP given by DNS.
kenop@KenWSLUbuntu:~$ nslookup esxi.voip.local Server: 10.255.255.164 Address: 10.255.255.164#53 Name: esxi.voip.local Address: 10.255.255.162kenop@KenWSLUbuntu:~$ ping 10.255.255.162 PING 10.255.255.162 (10.255.255.162) 56(84) bytes of data. 64 bytes from 10.255.255.162: icmp_seq=1 ttl=64 time=0.642 ms 64 bytes from 10.255.255.162: icmp_seq=2 ttl=64 time=0.314 ms 64 bytes from 10.255.255.162: icmp_seq=3 ttl=64 time=0.276 ms 64 bytes from 10.255.255.162: icmp_seq=4 ttl=64 time=0.267 ms 64 bytes from 10.255.255.162: icmp_seq=5 ttl=64 time=0.341 ms 64 bytes from 10.255.255.162: icmp_seq=6 ttl=64 time=0.275 ms ^C --- 10.255.255.162 ping statistics --- 6 packets transmitted, 6 received, 0% packet loss, time 5003ms rtt min/avg/max/mdev = 0.267/0.352/0.642/0.133 ms -
Attempt to access via Web browser using the ESXi Host’s FQDN. Verify that you can log in and browse around the ESXi Web Interface.

Setting up vCSA 6.5 (vCenter Server Appliance)
Create the vCSA 6.5 VM
- VMWare Workstation > File > Open….
- Navigate to location of vCenter Server Appliance OVA Template. Open it.
- Accept the EULA.
-
Name the new VM.
vCSA -
Storage path.
E:\VirtualMachines\vCSA - Press next.
- Tiny vCenter with Embedded PSC (Platform Services Controller). PSC functions as a “controller” for the vCenter servers. You can use an External PSC to manage multiple vCenter servers, or you can embed PSC into vCenter at a 1:1 ratio.
- Press next.
-
Networking Configuration (Fill these in from top down).
     Ipv4.
         Static.
             X.x.x.x (IP address).
             24 (Prefix aka Subnet Mask – 24 is 255.255.255.0).
             X.x.x.x (Default Gateway).
             10.255.255.164 (DNS Server. Use the DNS IP configured in the steps above relating to Win Serv 2012 R2.)
             vcsa.voip.local (FQDN/Network Identity)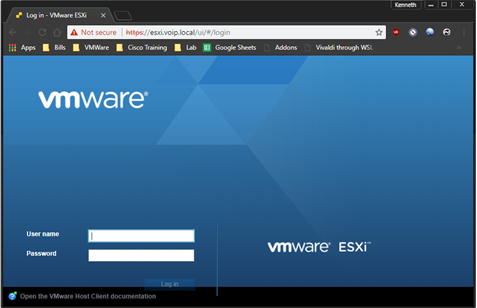
-
SSO Configuration (Skip this, if you can. I didn’t document any steps here, and in hindsight, maybe I should have.)
-
System Configuration.
*password* *password* -
Miscellaneous. If it says “false”, leave it “false”
-
Networking Properties.
Vcsa Voip.local - Click Import.
Please Wait - Things Are Happening
- The new VM is Imported from OVF to full VMX, VMDK, etc. files in “E:\VirtualMachines\vCSA".
- The new VM is booted for the first time.
- Various things take place here, such as hardware detection, etc.
- The script kicks off from the OVF side to configure what was entered relating to the network, root account pw, sso, etc. into the .vmx file in “E:\VirtualMachines\vCSA".
This part, ideally, would occur in an ESXi environment, however does not in VMWare Workstation.
When the VM is fully booted, it will show the DCUI similar to ESXi, except it will be blue on top. (See below)
IMPORTANT NOTE
DO NOT TOUCH THE VM FOR 30-60 MINUTES POST IMPORT. IT WILL TAKE A LONG TIME TO APPLY THE SETTINGS VIA THE SCRIPT/OVF TEMPLATE
I restarted the VM at various stages in previous attempts due to a lack of network settings, root pw, vmdir pw, etc. and each attempt resulted in a brick’d VM. Just don’t do it. It’s not worth it. I promise.

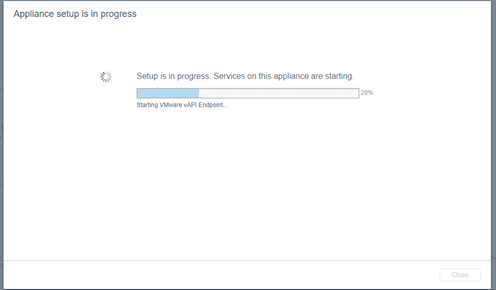
Access the VM via the GUI in a Web Browser. It will prompt to login using root credentials (the password set when deploying the OVF template) and you will be greeted with an indication that the setup is in progress.
DO NOT REBOOT OR TOUCH THE VM UNTIL THIS COMPLETES
<img src=”https://nocthoughts.com/assets/images/lab11.png” alt=”vCSA’s DCUI. Very similar to ESXI’s, now in “Blue”.” />
ESXi and vCSA Are Now Installed
VM will complete set up and provide link to access.
Click on the Flash based weblink.
<img src=”https://nocthoughts.com/assets/images/lab13.png” alt=”Click on the “Appliance Getting Started Page” URL.” />
This will lead you to the following URL. Bookmark it. In fact, bookmark both of the below (Do note that the URL may be different depending on your chosen domain and vm hostnames):
You now have the vCSA (vCenter Server Application), and ESXi installed in VMs, and have DNS working for them.
If you attempt this you can learn from my mistakes on the vCSA VM as the setup extended into day 2 due to my lack of patience and breaking the VM due to rebooting it during set-up. However, having these VMs installed you can play around with ESXi, set up a lightweight linux distro, or if you’ve given the ESXi host sufficient resources, you can even set up a CUCM/CUC pair with a small Windows install for CIPC/Jabber testing between the VM and an endpoint installed on your local machine.
Setup of further VMs such as CUCM, CUC, IM&P and the integration between them will be detailed in a future blog post. This setup allowed me to practice and familiarize myself with the GUI, ESXCLI and touch settings I can’t normally change/review in a production setting in preparation for the VMWare VCP6-DCV exam (Which I passed, in part due to using this lab for practice).
Hopefully this is helpful to someone, if not for a direct 1:1 translation and deployment at your home, but at least to show that you don’t always have to dump money into additional equipment to get experience with different pieces of software. If you have a weird/wacky lab setup, or know of some other tips or tricks leave a comment, or reach out to me on Twitter (@kperryuc)! Thanks for reading!