UC & UCC Best Practice - LRO and IR on ESXi
Let’s Talk About Best Practices
Over the past few years I’ve been involved fairly often (from the ESXi/UCS perspective) in troubleshooting issues with network latency/connectivity wherein only a single VM is impacted. One example that comes to mind is UCC VMs that encounter network issues and delays over the private link between the A and B Sides. Usually the network team gets involved first to ensure there were no issues on the private link itself, or any devices associated with it. The VMs are also cleared as a cause of the issue during initial review (when seeing the issue typically occurs downstream).
So when I start my review I want to keep relevant documentation in mind, specifically the virtualization requirements from Cisco regarding Large Receive Offload and a VMware KB relating to vHBA and PCI devices encountering issues when using Interrupt Remapping. Having IR and LRO enabled can lead to a degredation in UC/UCC App performance and although as of v8.6+ it is not required to be turned off, it’s still recommended “if issues are encountered”. With the relevant documentation linked below, I’ll detail the review and remediation steps.
Information Gathering
First Things First - Interrupt Remapping
There’s only one command required in the SSH session with ESXi in order to determine if Interrupt Remapping is disabled.
esxcli system settings kernel list -o iovDisableIR
For this command the following returns are possible:
- False - IR is not disabled
- True - IR is disabled

Second Thing… Second? Software And Hardware LRO Settings
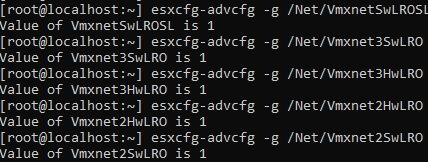
For this we have 5 total commands, one for each setting.
esxcfg-advcfg -g /Net/VmxnetSwLROSL
esxcfg-advcfg -g /Net/Vmxnet3SwLRO
esxcfg-advcfg -g /Net/Vmxnet3HwLRO
esxcfg-advcfg -g /Net/Vmxnet2SwLRO
esxcfg-advcfg -g /Net/Vmxnet2HwLRO
For these commands the possible returns are:
- 1 - Enabled
- 0 - Disabled

Remediation Steps - Interrupt Remapping & LRO
Now that we know that LRO is enabled across the board and IR is not disabled, we’d want to move forward with modifying these settings to the desired state – disabled.
Step 1 - Health Check
Perform any health check/data collection processes you need to follow for the VMs and Hypervisor.
Step 2 - Graceful Shutdowns
Gracefully shut down Guest OS’s, e.g. “utils system shutdown”.
Step 3 - Maintenance Mode
Place the ESXi host into Maintenance Mode, e.g. “esxcli system maintenanceMode set –enable true”

Step 4 - Change IR
Modify the IR Value using ESXCFG, e.g. “esxcfg-advcfg -k TRUE iovDisableIR
<img src=”https://nocthoughts.com/assets/images/irlro4.png” alt=”Setting “Disable IR” to True.” />
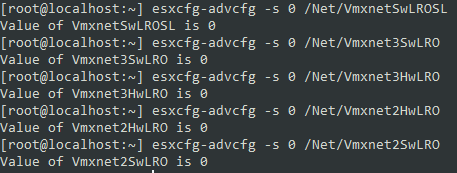
Step 5 - Change LRO
Modify the LRO Settings to “0” using ESXCFG, e.g. “esxcfg-advcfg -s 0 /Net/VmxnetSwLROSL”

Just to note the console look is different, I did these steps separately and used Powershell for most of it, and ConEmu w/ Ubuntu Theme for this session. Oops!
Step 6 - Save
Save the config, e.g. “auto-backup.sh”

Step 7 - Reboot
Perform a reboot on the ESXi host.

Verification & Post Change
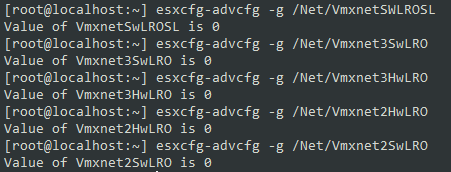
Now that the setting has been modified, config saved and the ESXi host restarted we’ll want to verify that the setting changed, we can do that with the same queries we ran before
Step 1 - Verify IR
Verify iovDisableIR is set to TRUE

Step 2 - Verify LRO
Verify LRO settings are set to “0”.

Step 3 - Maintenance Mode Off
Turn Maintenance Mode Off

There we go. We’re ready to power on the VMs in the desired order (if such an order exists) and proceed to VM health checks and testing.
If you found this useful make sure to share this blog post and the underlying documentation, there’s a decent amount of deployments still running older software (v7-8.6) where this is required, and many more where it can be beneficial. As always you can follow or reach out to me on Twitter (@kperryuc) and on LinkedIn.